RV travel is awesome because it means you’ll have all the comforts of home no matter where you land. And one of the things that makes an RV so comfortable? RV hookups, of course!
RV hookups are available in many (but not all) campgrounds. They allow you to have electricity and running water while parked in a campsite, and they give you a place to get rid of wastewater once those tanks fill up. That said, there are some things you’ll want to know before you dive into using any sort of RV hookup.
RVs For Rent Near You
RV Water Hookups
The water RV hookup is first on our list.
Yes, you could fill your freshwater tank at home and use the water by turning on your RV water pump, but using the campground water connection means you’ll have an unlimited water supply for the entirety of your camping trip. It also means you won’t have to lug a heavy tank full of water to your final destination. For this reason, we highly recommend using an RV water hookup if it is available.
To find your RV water hookup, look for something like the outdoor water spigot you likely have at home. RV water hookups are almost always threaded, making it easy to connect a freshwater hose by twisting it into place. Sometimes the water will be turned on by twisting a knob. Other times, you will need to pull up on a lever to start the flow.

Notes about RV Water Hookups
If a Spigot Isn’t Threaded
If you find a water spigot that is not threaded, it likely wasn’t made to be used as a water hookup. If you’d like to use the water from the spigot anyway, check for signage about whether the water is potable. If it is potable, you can use a Water Bandit to connect your freshwater hose to the spigot and use that to fill your RV freshwater tank.
We don’t recommend staying connected to a spigot that isn’t threaded for RV hookups.
Water Hookups During the Winter
Another thing to note is that some campgrounds will winterize their water hookups during the cold months. In some instances, this means that the water will be turned off completely. Be sure to call ahead to campgrounds you’ll be visiting during the winter months to ensure they will have running water.
If you connect to a water spigot during freezing weather, it is advisable to use a heated water hose. You may also want to run space heaters near the water lines to ensure they do not freeze.
RV Electric Hookup
Next up, RV electric hookups. These are needed to run high-power appliances that cannot be run using the RV battery and are especially important if you don’t have solar panels, a big battery bank, and an inverter in your RV.
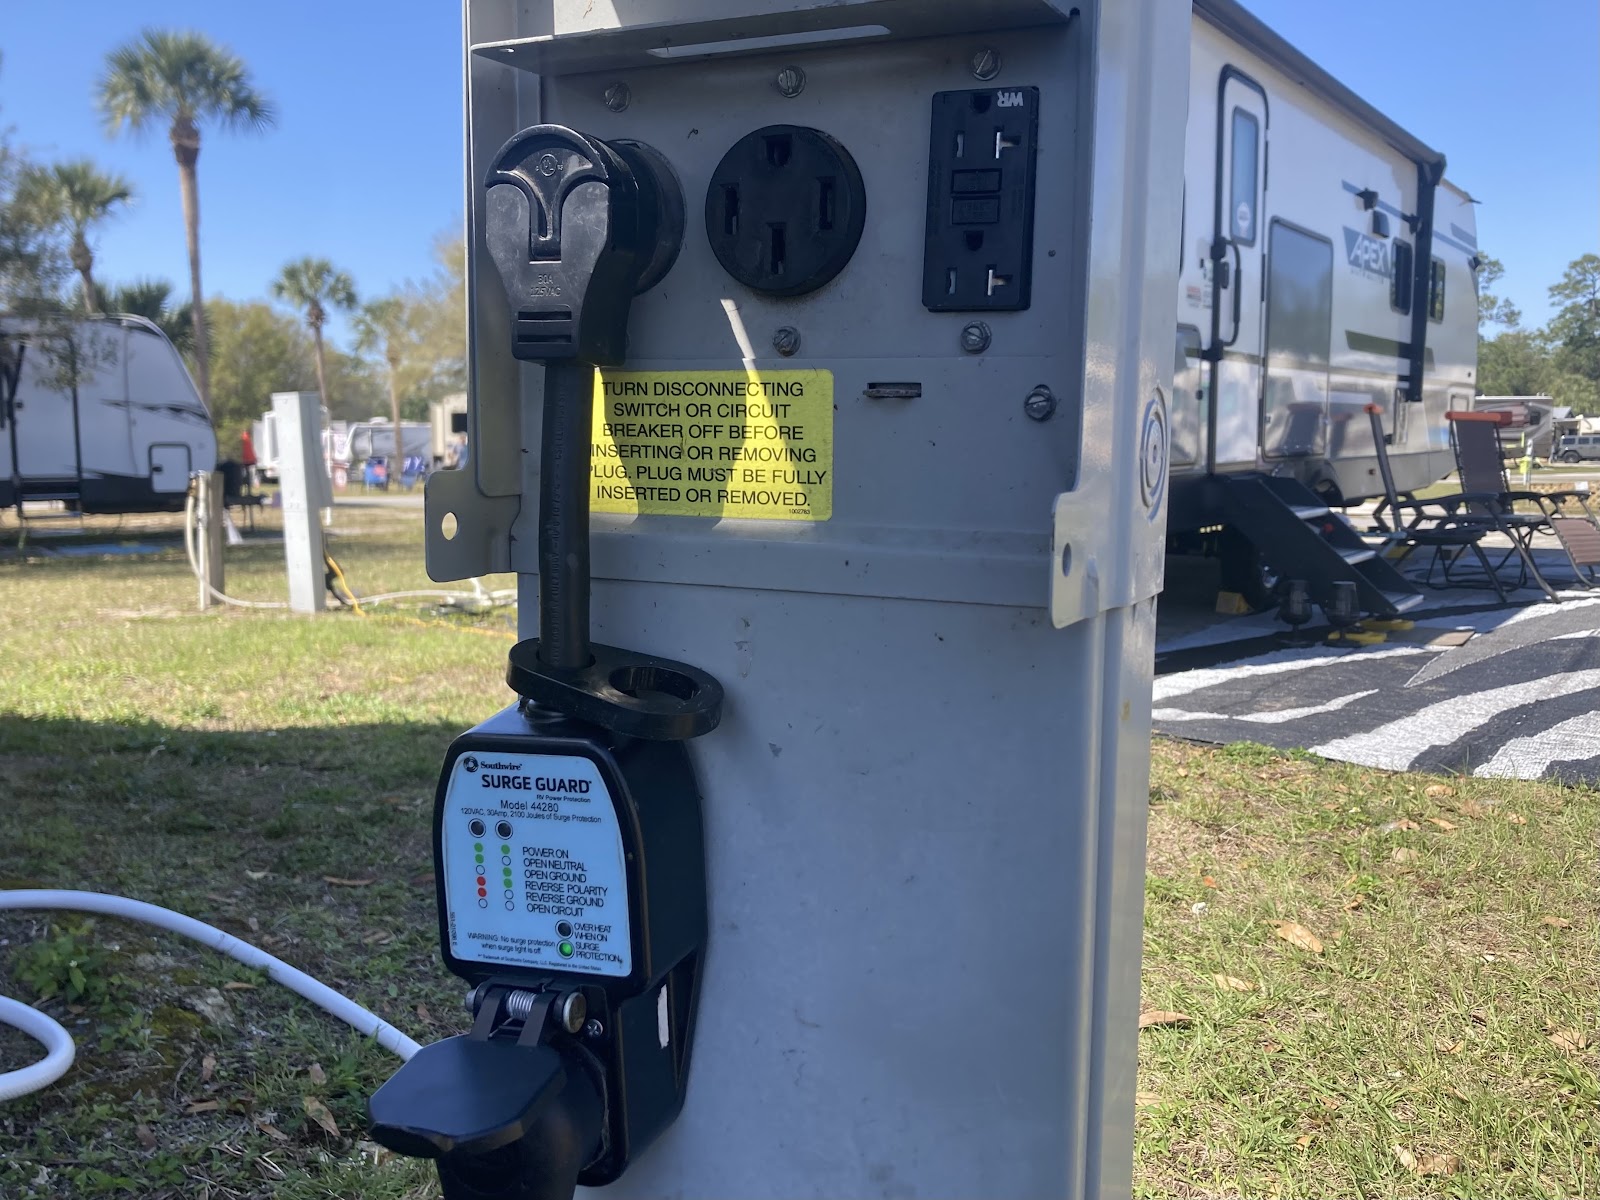
At many campsites, the electric hookup is found in a small metal box connected to a short pole or post. Most power poles at campgrounds include outlets for both 30-amp and 50-amp rigs, and 20-amp outlets for plugging in outdoor appliances.
To determine which one your RV requires, take a look at the power plug on the outside of your RV. If it includes three prongs, it is a 30-amp RV. If it includes four prongs, it is a 50-amp RV.
If the campground you are visiting only has one type of electric hookup, don’t worry. There are dogbone adapters you can get to plug your RV into either type of outlet.
Notes About RV Electric Hookups
Tripping the Breaker
Note that if you run too many appliances in your RV simultaneously, you can easily trip the breaker on the outside power pole. This is especially likely to happen if you use a dogbone adapter to plug a 50-amp RV into a 30-amp outlet, as 50-amp rigs tend to have two air conditioner units rather than one.
You can avoid this by running only one high-power appliance at a time. If you do happen to trip a breaker, simply turn off one appliance before going outside to flip it back on.
Dryer Outlets
Many RV owners wonder if they can plug their campers into a dryer outlet. This is understandable because dryer outlets offer 30-amp power. However, because these outlets are wired differently, it is actually very important that you do not plug your RV into one. Doing so could cause severe damage.
RV Sewer Hookup
Some campers won’t camp without full hookups at their site. What are full hookups? These are campsites that include water, electricity, and a sewer hookup. While there are an enormous number of campsites out there that boast water and electric hookups, individual sewer hookups are a little bit less common, so this is something you might have to seek out.
A sewer connection on your campsite is great because it allows you to dump wastewater into the city sewer system or a septic tank without breaking camp. The sewer hookup will look like a pipe coming up out of the ground. Usually, the pipe opening is covered by some sort of lid. To use the connection point, you will remove the lid and connect a sewer hose, which will allow water to run out of your rig and into the sewer.
Notes About RV Sewer Hookups
City Regulations to Be Aware Of
Some cities have regulations in place that require campers to use sewer hose support ramps. Honestly, we think these ramps are pretty essential anyway, but many campers choose to go without them. If this is the route you choose to take, know that you may eventually come across a campground that requires you to purchase a ramp.

Essential Equipment for Using RV Hookups
There are a handful of items that you will definitely need to collect before your first camping trip so you can make use of the RV hookups at your campsite. We’ve listed these items below so you know exactly what to shop for.
Freshwater Hose
A freshwater hose is made differently from a traditional garden hose and is therefore safer to drink from. These hoses are always white or blue, making them easy to differentiate from green garden hoses and black wastewater hoses.
Water Pressure Regulator
RV plumbing can’t withstand high water pressure. An RV water pressure regulator will ensure the water going into your RV does not damage the water lines and fittings.
Leveling Blocks
Achieving a level RV is essential for comfort and the proper functioning of appliances. Always carry leveling blocks to help stabilize your RV on uneven terrain.
RV Surge Protector
Electrical fluctuations can damage your RV’s electronics. An RV surge protector acts as a safeguard, preventing power surges and ensuring a stable electricity supply. We recommend one that can also detect issues with the power supply.
RV Sewer Hose
An RV sewer hose in good condition with all the right connection pieces is a must-have for the safe and sanitary disposal of waste water.
Extra Items You May Need
The items above are necessary in every instance. In some specific instances though, you may need or want even more accessories for getting your RV hooked up and ready to camp.
RV Extension Cord
Some campground power poles are situated oddly far away from the RV pads themselves. In these cases, an RV extension cord can be very handy. Make sure you choose a cord that can handle the amount of power an RV pulls. A household extension cord won’t do the job safely.
Dogbone Adapters
We talked about the fact that some campgrounds only offer 30-amp or 50-amp hookups. Because of this, many people find it helpful to carry either a 30-to-50 amp or 50-to-30 amp adapter with them, depending on their needs.
Extra Freshwater Hose
Power outlets aren’t the only RV hookup that can be found strangely far away from the parking pad. Occasionally, campground water spigots will be scattered in the strangest of places. Carrying an extra length of freshwater hose can make it possible to reach far-away hookups.
RV Inline Water Filter
Campground water isn’t always the best tasting. An inline filter is the perfect solution to this problem and is super simple to use.
Sewer Hose Extension
Just in case the sewer hookup is far from your RV, you might want to carry an extension piece for your sewer hose. This will ensure you can always reach the sewer connection point.
Sewer Hose Support
As we mentioned above, some campgrounds require you to use a sewer hose support ramp. These handy tools hold your sewer hose at an incline, ensuring water flows into the drain.
Clear Sewer Hose Elbow
As gross as it is, it can be helpful to see what is coming out of your wastewater tanks and whether the water is running clean. This is where a clear sewer hose elbow comes into play.
Wastewater Tank Backflush Tool
Lastly, if your RV isn’t already equipped with a way to flush the tanks, you might want to invest in a backflush tool that allows you to spray water into the waste tanks, cleaning out any gunk that may be left behind after dumping.
RVs For Rent Near You
How to Connect to RV Hookups
Now that you have a basic understanding of the different RV hookup types and the tools you’ll need to use them, let’s talk about how you can go about connecting your RV to the campground’s hookups.
Check Campground Amenities
Before you book anything, check the campground’s website to make sure it includes the hookups you would like to have. If the website doesn’t specify which type of electric outlets are available, call ahead to ask so you can pick up an adapter if necessary.
Note: Besides the basic water, electric, and sewer hookups, you may also want to ask about cable hookups and Wi-Fi availability if those things are important to you.
Related: How to Choose a Campground
Consider Hookups While Parking
When parking your RV, keep the hookups in mind. Do your best to line the sewer connection up with the wastewater outlet on your RV if at all possible, and make sure the water and electric hookups are close enough that your freshwater hose and electric cord will reach.
It is also important to make sure the RV is level when parking. This will prevent damage to the fridge, ensuring your food stays cold throughout your trip. It will also help ensure the waste tanks dump properly. Of course, having a level RV is also more comfortable than staying in one that is tilted to one side.
Connecting to RV Water Hookup
Start the hookup process with the water connection. First, connect the water pressure regulator to the end of your freshwater hose by twisting it into place. If wanted, add an inline filter on the other side of the hose. Connect the regulator end of the hose to the water spigot and turn the water on, letting it run for a few minutes to ensure the hose is free of debris and to prep the filter.
After 3–5 minutes, turn the water off at the spigot and connect the other end of the freshwater hose to the city water inlet on the RV. If you are using a filter, the flexible connection piece that comes with the filter will attach the hose and filter to the city water inlet. Turn the water back on and check the pressure at the RV sinks, adjusting as needed.
Connecting to RV Electric Hookup
Now for the electric connection. First, identify whether you have access to 30-amp power, 50-amp power, or both. If a dogbone adapter will be needed, make sure the breaker is in the ‘off’ position and plug the adapter in. Otherwise, simply turn the breaker off and move on to the next step.
Next, you will need to break out the aforementioned surge protector with the ability to check the connection for issues. Plug the surge protector in, flip the breaker to the ‘on’ position, and check the lights or screen on the surge protector.
If everything checks out okay, turn the breaker back off, plug the RV electric cord into the surge protector, and turn the breaker back on. This should power up the RV.

RV Waste Management
Lastly, there is the matter of the sewer RV hookup. For this one, we recommend wearing some disposable gloves.
You’ll start by removing the cover from the in-ground sewer connection point. With the cap off, screw the threaded connection piece into the connection point, making sure it is secure. Next, add the plastic elbow piece to the threaded connection piece, turning it to lock it in place. The actual sewer hose is twisted on the elbow at this point, and you will want to check your connection once again to make sure it is secure.
With those parts all securely fastened together, you can move on to the RV itself. Locate the dump point, which could be somewhere on the bottom of the RV or might be hidden away in a storage bay. It will have a pipe piece, which is what the sewer hose connects to, as well as two handles that can later be pulled to release the wastewater. Connect the detached end of the sewer hose to the pipe coming out of the RV by removing the cap on the end of the pipe and twisting the hose into place.
Once you have the sewer hose attached on both ends, you can release the wastewater. First, pull the handle that releases the black water, allowing it to run until the tank is empty. You can then choose to fill the tank with clean water and dump it again to flush it out, or use a backflush tool to do the cleaning. When you are finished cleaning the tank, close the black tank handle.
The gray water should be released after the black water in order to clean any debris from the black tank out of the sewer hose. To do this, simply pull the handle for the gray tank. Once the gray tank is empty, close the handle.
Breaking Camp
Obviously, you will need to head home at some point. To do this, you will have to disconnect from the campground’s RV hookups. Fortunately, this is pretty straightforward.
To disconnect the water, simply turn off the water at the spigot, detach your freshwater hose, hold the hose up high to get rid of any residual water—gradually working your way down the hose length to ensure the entire thing is cleared—and then put the hose away.
The electricity can be disconnected by turning off the breaker, unplugging the surge protector (and adapter if applicable), unplugging the RV power cord from the surge protector, and putting all of the above away.
Things do get a little more complicated when it comes to the RV sewer hookup. Again, you’ll want to don some disposable gloves. Also, after the black and gray tanks have been dumped, make sure that both their valves are fully closed before beginning the next step.
Empty the sewer hose as well as you can by lifting it up and encouraging water to flow into the drain. Detach the hose from the RV and use a garden hose (leaving a healthy amount of distance between) or a black water hose to rinse away any inner debris that might be left in the tube. Disconnect the sewer hose from the in-ground hookup and store in a bin. Replace the caps on the sewer hookup and on the RV sewer outlet.
As you can see, there is a lot to know about RV hookups. Fortunately, once you go through the process a couple of times, it’s actually pretty easy. With a little practice, you’ll be connecting to RV hookups like a pro in no time!


